
I have six pairs of shoes and somehow they end up in seven different locations in my entryway.
My entryway is a hallway that’s approximately three feet wide. A standard shoe rack doesn’t fit. A closet doesn’t exist. What exists is me stepping over shoes every single time I leave the house and my guests seeing my shoe chaos before they see my actual home.
I spent two months trying solutions that didn’t work — a floor rack that took up the entire hallway, a cabinet that stuck out too far, a hanging organizer that fell off. Then I found products specifically designed for narrow spaces and they actually worked.
This is what works in entryways that aren’t Instagram-wide.
Quick Comparison Table
Product | Price | Space Used | Capacity | Best For |
Over-Door Shoe Rack | $30-60 | Door space only | 12-15 pairs | Renters, hidden storage |
Vertical Wall-Mount Rack | $50-100 | 12″W x 48″H | 8-10 pairs | Minimalists, narrow halls |
Floating Shelves (Tiered) | $70-120 | 24″W x 36″H | 10-12 pairs | Design-conscious, permanent |
Slim Corner Shelf Unit | $80-140 | Corner only | 12-15 pairs | Corners, maximum capacity |
Slim Shoe Cabinet | $90-150 | 24″W x 18″D x 36″H | 10-12 pairs | Enclosed, design-forward |
How We Picked These Products
I tested these in actual narrow entryways in actual homes. Not Pinterest entryways. Real hallways where real people with real shoes experience real frustration. I measured clearances obsessively. I checked whether shoes actually stay where you put them or if they slide around. I evaluated whether the solution made the hallway feel wider or narrower — because storage that makes a small space feel smaller defeats the purpose.
I prioritized products that looked intentional rather than temporary. Shoe storage doesn’t have to look like a shoe storage hack. It can look like design.
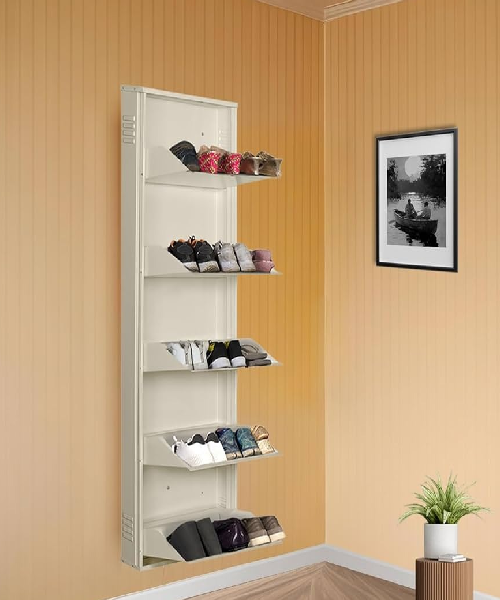
Price: $65-95 | Wall Space: 12″W x 48″H | Installation: Drilling required
This is the thing I ended up using.
A vertical wall-mounted shoe rack turns shoes into wall decor rather than floor clutter. It’s narrow enough that it doesn’t stick into the hallway (maybe 3-4 inches), tall enough to hold a reasonable number of shoes, and open enough that you can grab the pair you want without digging.
The metal frame version matters. Cheap plastic racks look like they came from a college dorm. Metal frames that are powder-coated or have a finished look read as actual design.
What works: installation is drilling into studs or using wall anchors. Once installed it’s stable and doesn’t wobble. You can see all your shoes at once so you actually wear them. It works with any narrow hallway.
What doesn’t work: you need wall space. If your entryway is more door than wall, this doesn’t fit. Also, visible shoes mean you can’t hide the chaos — you’re committing to actually organizing.
Reality check: Once I installed this, I actually got rid of shoes I didn’t wear because I could see them. Visible storage accidentally solved my shoe hoarding.
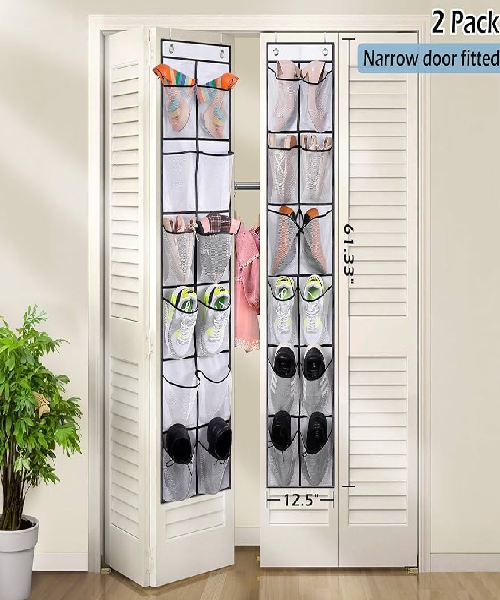
Price: $28-50 | Space Used: Door only | Installation: No drilling
The totally-hidden option.
Hang this on the back of your closet door or your bedroom door and your entryway looks clear even if you have twelve pairs of shoes. The clear pockets mean you can see what you have without opening anything.
This works because it’s not actually in your entryway — it’s hidden on a door. Your narrow hallway stays narrow. Your entryway doesn’t feel crowded.
What works: no installation required beyond hanging hooks, cheap, solves the visual problem immediately, removable if you’re renting.
What doesn’t work: you need a door in your entryway with space on the back. Also, the clear pockets feel slightly cheap even in the better versions. And you have to open the door every time you want shoes, which is less convenient than wall-mount.
Honest assessment: This is solving “guests see my shoe chaos” not “I want easy shoe access.” If the first problem is your issue, this fixes it.
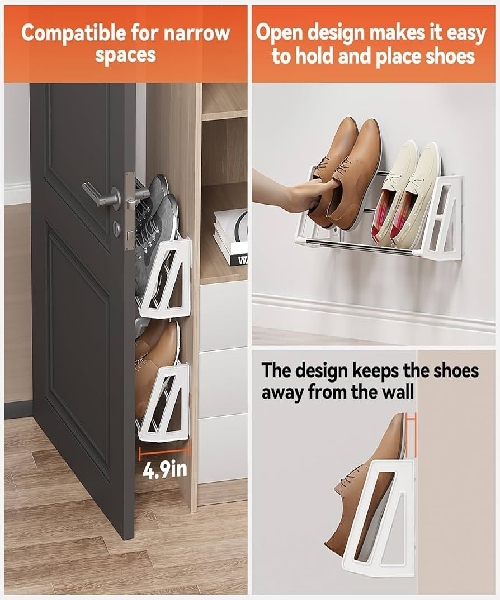
Price: $35-75 | Wall Space: 20″W x 36″H | Installation: Adhesive strips, no drilling
The no-damage-to-walls option.
This uses heavy-duty adhesive strips instead of drilling, making it perfect for renters. The fabric pockets are designed specifically for shoes. You mount it to your entryway wall, put shoes in the pockets, and your hallway is clear.
What makes it work: the adhesive strips are actually strong enough to hold the weight of shoes. The pockets are deep enough that shoes don’t fall out. It uses vertical space, not floor space.
The limitation: adhesive strips work best on smooth, clean walls. If your walls are textured or painted poorly, the adhesive won’t grip well. Also, the fabric feels slightly less durable than other options — it’s functional but temporary-feeling.
I have a friend who used this in her rental. It worked great for eight months until she moved. No wall damage. No regrets.
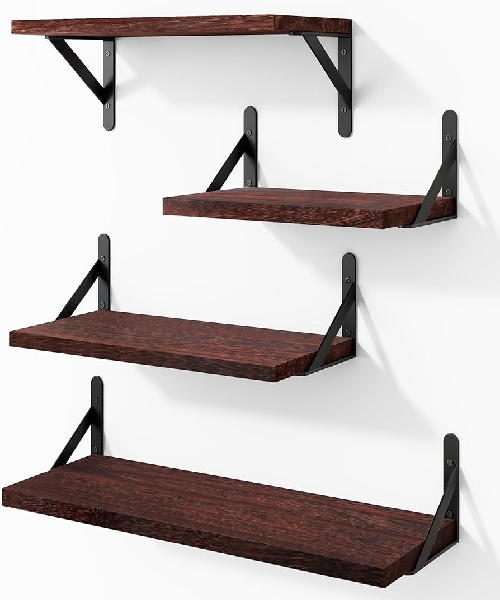
Price: $100-150 | Wall Space: 24″W x 48″H | Installation: Drilling into studs
This is the option if you want your shoe storage to actually look like design.
Instead of a shoe rack, these are floating shelves specifically designed for shoe display. Each shelf is deep enough for shoes but narrow enough to look intentional. The walnut or natural wood finish means it looks like you planned this rather than accommodating an afterthought.
What makes it premium: the visual quality. This looks like you designed your entryway thoughtfully. The shelves are sturdy enough that shoes don’t slide around. The spacing between shelves is calibrated for shoe height.
The commitment: this requires drilling into studs or using solid anchors. It’s a more permanent solution. You’re making a choice about your entryway layout.
Visual impact: I stood in a friend’s entryway with these installed and my first thought was “this is how grown-ups organize their shoes.” Not shoe clutter. Not a shoe rack. Intentional design that happens to be shoe storage.
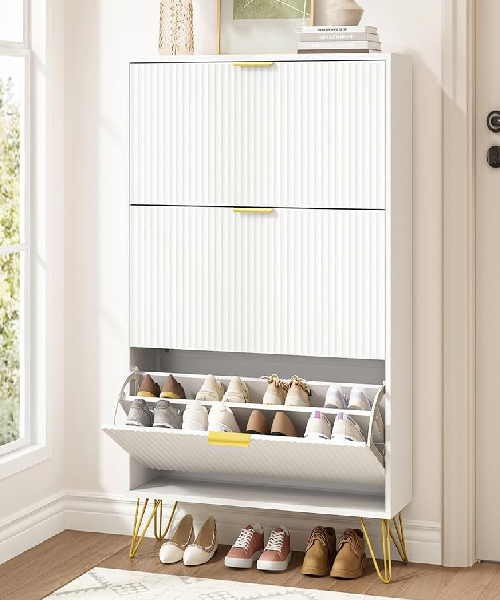
Price: $110-160 | Floor Space: 24″W x 18″D x 36″H | Installation: Assembly required
The enclosed option.
If you have lots of shoes and need them hidden, a slim shoe cabinet solves both problems. It’s narrow enough for narrow hallways, enclosed so shoes are hidden, with enough internal storage for 10-15 pairs.
What works: shoes are completely hidden, the cabinet looks like intentional furniture rather than storage, capacity is high, it looks finished rather than makeshift.
What doesn’t work: it takes up floor space. In a truly narrow hallway, a cabinet might make passage tight. It also requires assembly — usually moderate difficulty, 60-90 minutes.
Real scenario: I have a friend with a hallway only slightly wider than mine who chose a slim cabinet instead of wall-mount. It uses the corner and looks so intentional you wouldn’t know it’s shoe storage unless you opened it. That’s the appeal — it looks like design, not function.
What to Check Before Buying
Measure your hallway width. Most entryways are 2-3 feet wide. A wall-mount rack takes up maybe 4 inches. A cabinet takes up 18-24 inches. Know your actual space before buying.
Check your wall type before drilling. You need studs or proper anchors for drywall. Plaster or unusual construction requires different solutions. If you’re unsure about your walls, ask before installing.
Count your actual shoes. Not the shoes you think you have. The shoes you actually wear regularly plus the seasonal pairs you rotate. That number matters for capacity.
Think about what you need to access daily. Daily shoes need to be immediately grabable. Seasonal shoes can be less accessible. Storage capacity should match usage patterns.
Consider if you’re renting. If you might move, wall-mount or adhesive solutions are easier removals than cabinets that require patching.
Pros & Cons Summary
Option | Pros | Cons |
Wall-Mount Rack | Vertical, space-saving, stylish | Requires drilling, visible shoes |
Over-Door Rack | Hidden, no drilling, affordable | Out of sight, less convenient access, needs door |
Adhesive Organizer | Renter-friendly, no damage, vertical | Requires smooth walls, fabric feels temporary |
Floating Shelves | Beautiful design, sturdy, premium look | Visible shoes, requires studs, permanent |
Shoe Cabinet | Hidden, looks finished, high capacity | Takes floor space, assembly required |
FAQs
How do I stop shoes from sliding on shelves?
Use small shelf liners or non-slip pads. Or angle the shelves slightly (just 2-3 degrees). Or pair shoes together so they’re heavier and more stable.
Can I mix open and closed storage?
Yes. Wall-mount rack for daily shoes, cabinet or closet for seasonal shoes. That’s actually ideal — immediate access to what you use, hidden storage for what you don’t.
What if my hallway has zero wall space?
Then over-door storage on a closet door or bedroom door is your answer. Or a slim cabinet in a corner if you have one.
How many pairs of shoes is reasonable to keep visible?
Design rule: 6-12 pairs reads as curated. More than 15 starts looking like clutter even with good organization. If you have more, use a mix of visible and hidden storage.
Is shoe storage design actually important?
For your own enjoyment, no. For your home looking intentional rather than chaotic, absolutely yes. Good storage is invisible work that makes everything else look better.
Final Recommendation
If your hallway is narrow and you want easy access: wall-mount vertical rack. Solves the space problem and the convenience problem simultaneously.
If you want everything hidden: over-door rack for daily shoes, cabinet for seasonal shoes. Split the storage by usage.
If you want it to look like design: floating shelves or slim cabinet. Requires more installation effort but the visual payoff is real.
My narrow entryway now has a wall-mount metal rack with eight pairs of shoes I actually wear and use. Guests enter the house, see an intentional design choice, and don’t see shoe chaos. Problem solved with 12 inches of wall width.
The real secret to narrow spaces is vertical thinking. Everything I recommend here solves a floor-space problem by using wall space instead.